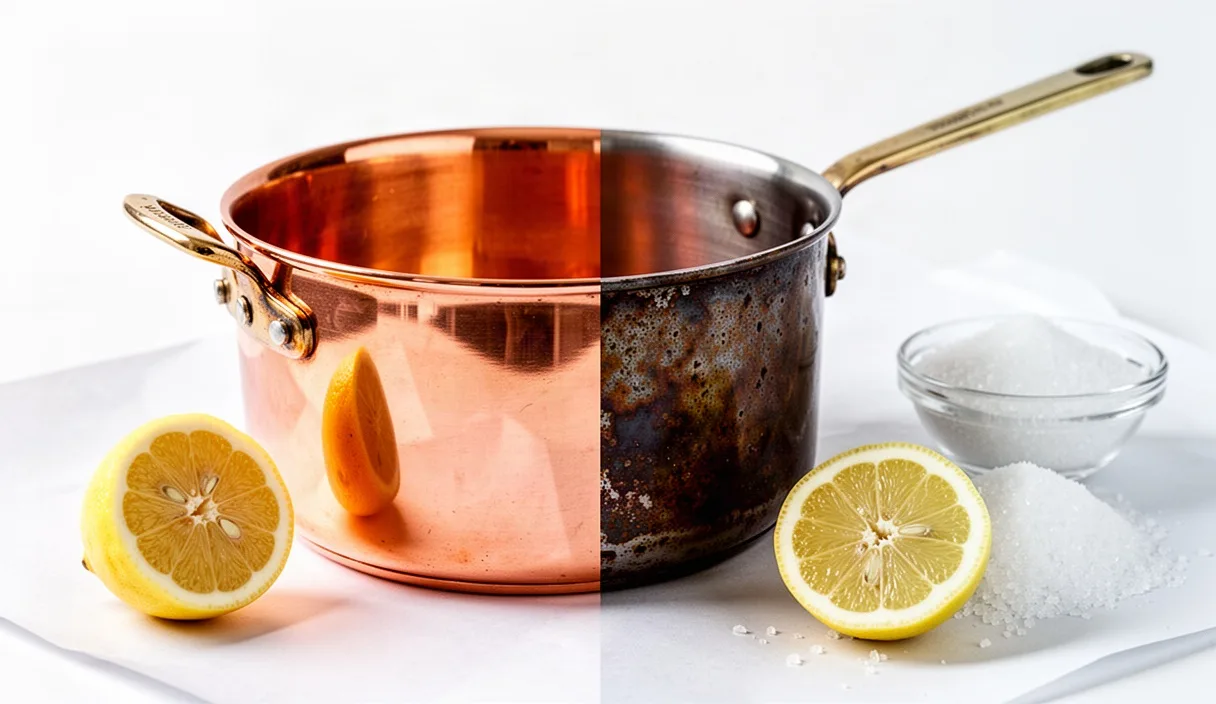
In our workshop, heavy copper cookware holds a distinct place on the racks. A well-constructed saute pan or saucier carries substantial thermal mass, responding to an open burner with a speed that cast iron or stainless steel cannot duplicate. Over weeks of exposure to heat, fat, and kitchen humidity, that glowing salmon-pink metal yields to dull amber, deep brown, and mottled oxidation. This tarnishing is natural copper oxide, forming as elemental copper reacts with airborne oxygen and sulfur compounds. While some cooks prefer a deep, dark working patina, a thick layer of oxidation dulls the metal's warmth and can hide grease buildup around the brass or iron handle mounts.
When the time comes to reveal the bare metal again, we avoid synthetic paste cleansers that leave artificial glosses and pungent chemical scents on our prep tables. Instead, we reach for whole lemons and dry sea salt. This centuries-old pantry combination works quickly, rinses clean without petroleum residues, and preserves the tactile character of hand-hammered or machine-spun copper. It requires only modest elbow grease, a careful hand around the linings, and an understanding of how modest acids react with oxidized metal.
The Chemical Reaction Between Acid, Salt, and Patina
The dark film on neglected copper consists primarily of copper(I) oxide and copper(II) oxide. When copper sits bare in the kitchen air, oxygen binds to its surface atoms. Over extended cooking sessions, heat accelerates this bond, deepening the color from bright penny tones to muddy purples and dark browns. While elemental copper resists pure water, its oxidized skin breaks down when exposed to low-pH liquids.
Citric acid, present in fresh lemon juice at concentrations between five and eight percent, acts as a natural chelating agent. By itself, lemon juice dissolves copper oxide at a modest pace, requiring long soaking times that can cause uneven etching. Introducing sodium chloride, ordinary table or fine sea salt, fundamentally changes the reaction kinetics. The chloride ions combine with the citric acid to create an equilibrium that yields weak hydronium and free chloride ions in solution. This combination attacks copper oxides rapidly, converting them into soluble copper citrate and copper chloride complexes that lift away from the sound metal underneath.
The chemical reaction happens almost immediately upon contact. You can see the pale copper skin emerge beneath a single wipe of the salted fruit. Because the sound copper underneath the oxide layer does not readily dissolve in dilute citric acid without prolonged exposure and strong oxidizers, the reaction stalls naturally once the surface film is cleared. This self-limiting nature makes lemon and salt far safer for the structural gauge of antique pans than harsh industrial mineral acids like hydrochloric or nitric mixtures.
Preparing the Natural Lemon and Salt Rub
Choosing the right fruit and grain size prevents unnecessary mechanical scratching while giving you adequate friction. We prefer firm, thick-skinned market lemons such as the Eureka or Lisbon varieties. Meyer lemons, while fragrant, have lower acid concentrations and thin skins that collapse under the pressure of your palm during scrubbing. For the abrasive, select fine-grain sea salt or standard table salt. Coarse kosher salt crystals often have sharp, irregular edges that can score mirror-finished copper, leaving microscopic tracks that trap future grease.
We work using one of two methods depending on the shape and scale of the cookware piece:
- The Direct Citrus Cut: Halve a lemon crosswise. Press the cut face directly into a shallow bowl filled with 30 grams of fine salt. The cut pulp acts as a natural sponge, releasing juice metered by your downward pressure while holding the salt grains against the copper face.
- The Workshop Paste: Squeeze 45 milliliters of fresh lemon juice into a ceramic bowl and blend in roughly 40 grams of fine salt until it forms the texture of damp sand. This slurry is easier to apply with a rag into tight gaps around handle forks, rivets, and rolled rims.
Before introducing any acid to the pan, wash away all lingering grease with hot water and ordinary soap. Acid applied over grease will bead up and leave greasy spots behind, resulting in a splotchy, uneven surface that forces you to repeat the work.
Working in Concentric Circles Across the Pan Body
Set the degreased pot base-down on a thick cotton towel folded over your workbench. The towel cushions the rim, arrests sliding, and absorbs runoff. Take your salted lemon half and place the seasoned face against the copper wall. Press firmly until juice starts to weep from the pulp, then sweep the fruit across the metal using compact, overlapping circular strokes.
Copper pans are shaped either by spinning on a lathe or through manual raising and planishing with steel hammers. Both methods leave subtle micro-lines running across the circumference. Work your circles along these circumferential lines rather than scrubbing up and down across the vertical wall. By following the original manufacturing marks, any subtle micro-burnishing blended by the salt will sit parallel to the pan's grain, preserving a clean visual depth.
| Zone of the Pan | Primary Buildup Type | Recommended Application Method |
|---|---|---|
| Sidewalls | Light oxide film, dust, mild grease | Direct lemon half with light, steady circular pressure |
| Base Exterior | Heavy heat tarnish, burner carbon | Salt slurry left to sit for 45 seconds, scrubbed firmly |
| Rivet Clusters | Hardened oils, trapped tarnish | Hog-bristle brush or linen rag dipped in thick paste |
| Rim Edge | Handling grime, poured-liquid drips | Lemon rind edge folded over the lip and guided around |
Move systematically around the pan in sections roughly 10 centimeters square. As the salt crystals dissolve into the juice, the mixture will lose its bite and turn slightly green-blue. Dip the lemon back into your salt bowl frequently to renew the abrasive bed. When clearing the tight radiuses around handle rivets, switch from the broad fruit face to a folded strip of cotton cloth dipped into your paste, working the material into the seams with your thumb.
Washing Off Acid Residue with Mild Suds
One of the most frequent domestic mistakes when cleaning copper is walking straight from the acid scrub to a dry cloth. If residual lemon juice dries on bare copper, it reacts with airborne oxygen to form irregular, streaky stains known as acid bloom. In damp environments, this residue can turn into green copper carbonate, often called verdigris, within twenty-four hours.
As soon as you finish the scrub, carry the piece directly to a deep sink. Run warm tap water at approximately 40 degrees Celsius over every cleaned surface. Using a soft vegetable sponge and two drops of neutral dish soap, wash the copper thoroughly. The mild surfactants in the soap break the remaining citrus oils, while the alkaline rinse neutralizes any trace acid tucked beneath the handle base or around the rim folds.
Inspect the copper under direct, clear lighting while the pan is still wet under the stream. Areas where oxide lingered will appear as cloudy, dull gray-brown patches beneath the water film. Touch these spots up immediately with a pinch of salt and a lemon wedge, wash them once more with soap, and flush the metal with hot water. Warm metal sheds surface water much faster than cold metal, which simplifies the drying process.
Buffing to a Soft Glow with Cotton Rags
Bare, freshly stripped copper oxidizes quickly if water droplets evaporate on its skin. Mineral solids in tap water leave ring-shaped spots that etch into the reactive metal surface. The moment the soapy water is rinsed away, envelop the pot in a dry, lint-free cotton flour-sack towel or heavy cotton flannel. Blot the exterior firmly, paying specific attention to the crevices under the handle join.
Once dry to the touch, take a second dry cloth, an old cotton jersey undershirt or a scrap of unbleached flannel works best, and begin buffing the metal. Grip the cloth tight against the flat of your fingers and rub along the direction of the spun grain. Use long, rapid back-and-forth strokes. The friction generates a modest amount of surface heat, driving off remaining micro-moisture and aligning the crystalline surface of the copper.
This method will not produce the unnatural, synthetic mirror sheen created by jeweler's rouge and high-speed buffing wheels. Instead, it reveals the honest, satin glow of working copper. The metal takes on a soft, warm hue that shows its true thickness and the minor imperfections earned through kitchen use. This soft glow provides an ideal foundation for a stable, slow-building kitchen patina to form once the pot returns to daily cooking.
Protecting Tin Linings During Exterior Cleanups
Most traditional copper cookware features an interior lining of pure molten tin, wiped by hand to create a non-reactive barrier between acidic foods and bare copper. Tin is an exceptionally soft metal, registering roughly 1.5 to 1.8 on the Mohs hardness scale, compared to copper at approximately 3.0. Because tin is so soft and chemically sensitive, you must treat the interior lining with great care while restoring the exterior walls.
Never scrub the tin lining with salt. Salt crystals will scratch the soft tin, creating micro-furrows that trap food particles and cause premature wear down to the bare copper substrate. Furthermore, while tin handles moderate food acids during cooking, strong, raw citrus juice concentrated with salt will etch the silvery tin surface, turning it dull, chalky gray and shortening its working lifespan.
To shield the lining during maintenance, follow these precautions:
- Keep the interior of the pot completely dry before you begin working on the exterior copper shell.
- If the pot has a broad, flat rim, coat the interior edge with a very thin barrier of neutral cooking oil on a rag to repel accidental acid drips.
- Hold the pan by its iron handle or insert one clean hand inside the body, resting your palm flat against the tin floor to manipulate the vessel without touching the exterior acid slurry.
- If lemon juice splashes into the interior, rinse it out immediately with a wet sponge and neutral soap rather than waiting until the entire exterior is cleaned.
If your tin lining already shows patches of bare copper larger than the size of an ordinary coin, cleaning the exterior will not fix the issue. At that stage, avoid aggressive rubbing near the exposed interior spots and plan to send the pan to a professional coppersmith for traditional hand re-tinning.
Common Mistakes to Avoid
Restoring metal with natural materials is a straightforward craft, but minor errors in timing or pressure can cause unnecessary setbacks. Keep these typical pitfalls in mind before beginning:
- Using sea salt with coarse flakes: Large salt flakes do not dissolve smoothly in lemon juice. They drag across the copper face like gravel, leaving fine swirling scratches that require heavy machine buffing to remove. Use finely ground salt only.
- Soaking the entire pan in an acid bath: Submerging a copper pan in a tub filled with lemon juice or vinegar water is an uncontrolled shortcut. Acid baths can corrode cast iron handles, degrade brass rivets, and cause severe etching along the edge where the tin lining meets the copper lip.
- Letting the paste dry on the metal: Acid pastes must remain moist while on the metal. If the lemon-salt paste dries completely on copper, it creates an uneven, crusty rim of oxidation that is twice as stubborn to remove as the original tarnish.
- Reheating the pan while wet: Placing a freshly cleaned, damp pan directly onto a fire to dry it will create instant heat rings and dark heat tarnish from minerals in the water. Always hand-dry thoroughly with textiles first.
Practical Maintenance and Next Steps
Once your copper pot is clean, dry, and buffed, proper everyday handling will preserve its warm luster without requiring constant deep cleanings. Store your copper vessels in an area with good air circulation, away from direct stove steam, dishwashers, or boiling stockpots, as airborne moisture carries microscopic grease droplets that start the tarnish cycle again.
For day-to-day cleaning after service, wash the pot in warm water using a soft cloth and a gentle dishwashing soap. Dry it completely with a kitchen towel while the metal is still warm from the tap. A light buff with a dry cotton rag after every other wash is usually enough to keep heavy oxidation at bay for months. When the warm salmon color eventually begins to slip toward dark bronze once more, pull a fresh lemon and a jar of fine salt from your pantry, set down your towel, and repeat the rub.